Home Improvement: DIY makeover on my turd of a kitchen for less than $500 |
- DIY makeover on my turd of a kitchen for less than $500
- Finished Basement redo, photos included
- Purchasing a home with an unpermitted master bedroom addition. Thoughts?
- Lumber shortage
- Why are wall mounted toilets not more popular?
- laminate vs vinyl flooring in the basement
- Getting quotes for driveway repaving. Airport mix vs. 9.5mm
- Tiled wall meeting drywall. Ledge that needs to be addressed. Could use some advice.
- How do I modernize this?
- How to install something like a 'whole home fan' to create airflow
- Does anyone have a remodel spreadsheet they would be willing to share?
- Adding a recessed socket to a side table
- Pony wall removal tips
- DIY deer repellent? They are eating all my hydrangeas!
- Composite vs. Wood Deck for a Jacuzzi/Spa Tub
- Help with ideas for DIY backyard oasis...in a rental
- Could use help using a drain snake
- Best Attic Ladder--Wood or Aluminum? And Which One (Brand/Model)?
- courtesy to borrow neighbor's driveway?
- [HELP] Need tips & strategies for my ditch project
- Egress Windows Experiences?
- Can I add a shower hose to this faucet?
- Fluctuating water temperature from new tankless hot water heater
- Help with outlet location for new wainscotting
| DIY makeover on my turd of a kitchen for less than $500 Posted: 08 Jul 2020 02:16 PM PDT TL;DR: Painted upper cabinets and backsplash white, countertop used marble countertop paint kit, and lower cabinets grey and yes, I'm aware my hood vent is stupid high (another project for another time). Here are the progression pictures: https://imgur.com/a/nvQqPqy I didn't think to take a really good before picture until after I finished the upper cabinets, so I used the picture of the kitchen from before I moved in. The cabinets look super gross in the before picture. For years, I have wanted to tear out this kitchen and start fresh. The cabinets aren't in great shape, there are false drawers where they should have had actual drawers and don't get me started on that ridiculously high hood vent. However, that costs a lot more money than I'm ready to fork over at the moment. So until that day arrives (if ever), I've decided to do a DIY cosmetic makeover to my crappy kitchen. I chose to go with a two-toned kitchen (white uppers and grey lowers) with white marble countertops and a white backsplash. This small, dark kitchen definitely needed the white to brighten up the space, but I don't trust the lower cabinets to stay clean looking with some of the people living in this house, so I chose to go darker with the lower cabinets. This is my first time doing this, so I'm sure I made a lot of mistakes, but I'm overall very happy with the results. I did this makeover in phases starting with the upper cabinets and hinges > backsplash > lower cabinets and hinges > countertops. I purchased all the supplies as I moved on to the next phase (ended up totaling around $430) but I'm sure if you bought all the supplies at the same time you might end up saving even more money. I still need to switch out the outlets and light switch covers to a white, but I have no immediate plans to do that yet. You might notice that I also have a new faucet and towel bar. I added those prior to this remodel and have linked them at the very bottom of this post. I've listed my entire process and product lists below. Warning: This is a very long post Here's the full makeover process I followed if you're interested: Upper Cabinets:I mostly followed the instructions from the Giani Granite cabinet painting tutorial (with some alterations): "Nuvo Cabinet Paint - Instructional How-To Video" by GianiGranite But here is the full process that I followed for the upper cabinets:
Upper Cabinet Supplies List:
\* Already owned this item prior to this phase Upper Cabinet Paint Cost + Tax (My cost / Total supplies cost) = $61.02 / $101.34 Hinges:The hinges, which are visible from the outside of the cabinets were originally an antique brass color that wouldn't go with the new cabinet colors, so I decided to spray paint them a silver metallic color. I used this video tutorial as a guide: "Spray Painting Old Hinges to Look Like Brass - Antique Restoration Repair Furniture" by Ross Taylor Woodworks My hinge painting full process:
Hinges Supplies List: (Prices rounded up to the nearest dollar)
\* Already owned this item prior to this phase Full Hinge Paint Cost + Tax (My cost / Total supplies cost) = $13.99 / $21.00 Backsplash: I painted our stone backsplash white using this video tutorial as a guide: "How to Paint a Tile Backsplash | Ask This Old House" by This Old House However, since my backsplash was more porous than the backsplash featured in the video, I decided to use the leftover primer and white cabinet paint I used for the upper cabinets. Following the advice from this blog: https://athomewiththebarkers.com/paint-stone-backsplash/ After I finished painting the backsplash I realized that the blog suggested using a semi-gloss paint, but my paint was satin, therefore more matte than I wanted, so I went over it with a couple of coats of Semi-Gloss Polyurethane. My full backsplash process:
Backsplash Supplies List:
\* Already owned this item prior to this phase Full Backsplash Cost + Tax (My cost / Total supplies cost) = $49.46 / $120.54 Lower Cabinets:Again, I mostly followed the instructions from the Giani Granite cabinet painting tutorial here: "Nuvo Cabinet Paint - Instructional How-To Video" by GianiGranite Here is the full process that I followed for the lower cabinets:
Lower Cabinet Supplies List:
\* Already owned this item prior to this phase Lower Cabinet Paint Cost + Tax (My cost / Total supplies cost) = $80.68 / $108.87 Countertop:I strongly suggest following the video instruction (and detailed manual): "Giani DIY Marble Countertop Paint Kit - Epoxy Topcoat" by GianiGranite I have tiled countertops, so if you have a smoother countertop, it will probably turn out even better than mine. I had to remove the caulking between the countertop tile and the wooden edge. I tried filling up that space with the wood patch but it didn't come out as smooth as I would have liked even after sanding. Now I will say that the wood patch that I used might have been too old and I didn't feel like buying more. In the end, I said f it and just went ahead with painting. So the edges are pretty shitty, but that is 100% my fault. Here are the steps I took: Surface Prep:
White Base Primer:
Marble Veining:
Epoxy: I suggest having two people for this step. One person to handle the epoxy with gloves and one person to set the timers, use the tweezers and hold a light as needed. If not, you will likely get epoxy on everything you touch.
Full Countertop Supplies List: (Prices rounded up to the nearest dollar)
\* Already owned this item prior to this phase Full Countertop Cost + Tax (My cost / Total supplies cost) = $226.70 / $258.41 Full Supplies List:Paints/Caulking:
\* Already owned this item prior to this project Full Kitchen Remodel Cost + Tax (My cost / Total supplies cost) = $431.84 / $496.75 Here are some items that I added to the kitchen before I did this total makeover: [link] [comments] |
| Finished Basement redo, photos included Posted: 08 Jul 2020 07:15 AM PDT It only took 2 years, but I've now completed a redo of our finished basement space. The work included a new kids playroom, home office, refinished oak stairs, and many other little fixes. I hired out for some specific stages of the project (drywall, plumbing), but I did 85-90% of the work on my own. I started as a relative novice, so I'm pretty proud of how well it all came out. Photo links here... Playroom -- https://imgur.com/a/U9uWAHv Office -- https://imgur.com/a/ZSu3Xp7 ...Looks like I need to add some build details to meet the rules for the Mods, so here goes: - First off, this project only happened because there is a fantastic old-school hardware store in my neighborhood that is a hub for local independent contractors. They first hooked me up with an excellent general contractor who came 3-4 times and simply walked through the job and talked me through how he would do things if he were building it. We paid his hourly rate the first couple times and by the end he refused and we paid him in cookies :) Its amazing how generous people can be if they see that you're just looking to learn. I also got an awesome electrician and carpenter through the hardware store who came and did parts of the job that were above my head. More than anything else, I learned a ton by asking "how would you..." questions when they were over. - Framing was built with 2x4 studs, 2x4 PT footers, and 2x6 headers. The 2x6 was required to meet code so there is some space for airflow between the wall and the foundation. Footers were laid with tapcons and liquid nails underneath the beam. Just to make my life harder, I spend a whole day on July 5th two years ago tearing down a parade float and separating out all of the studs that would have been headed for a landfill. I brought home about 60 studs that provided pretty much all of the vertical framing pieces. - I used r-13 insulation from Menards because at certain times during the year you can buy it really cheap. I think I only needed to insulate down to the frost line, but I did the whole 80" vertical to be safe. - 1/2" drywall was used for the walls and ceiling. I hired out for that process, but I did some of the finishing and I did all of the priming/painting myself. - Doors I bought at the ReStore and just primed/painted them before I hung them. - Base/shoe moulding were also from Menards. I found a local carpenter who was furloughed because of pandemic this spring who came and did a fair amount of the moulding cuts and taught me quite a bit about how to fit the angles correctly. - Flooring is "luxury vinyl" planks that snap together and do not use any adhesive underneath. The product is "AquaShield" and we used the Pebble Hickory color. It is completely waterproof and looked like it was made from some mix of plastic and stone. I think this particular flooring is typically used in more commercial settings, but we have a local flooring shop who sells it for $1.98 sq. ft., which seemed like an great deal. [link] [comments] |
| Purchasing a home with an unpermitted master bedroom addition. Thoughts? Posted: 08 Jul 2020 06:44 AM PDT Hi everyone. Came across a home listed as a 2 bedroom/1 bath. Checked it out and found that the current owner added a master bedroom and bathroom without permits. However, they are selling it as a 2 bed/1 bath. I could speculate many guesses as to why they did this (e.g., didn't want to pay higher property taxes, addition extends right at the property line, didn't want to pay permit fees, owner is a contractor, etc.). However, that addition has been there for 5 years. Put an offer in and was accepted. I would like to legally declare it as an ADU or even update tax records to list the home as a 3 bedroom/2 bath. Since it's been there for 5 years, can the city make me take the entire addition down if I were to notify them that I purchased the home as is? If I get a general contractor in there and they sign off that everything was completed up to code or have them fix the work to make it up to code, would that be enough to get a city inspector to write it off as clean? Also thinking worst case scenario, if a neighbor becomes disgruntled or even wants to make an addition to their home and the city is giving them a lengthy timeline for permits and they happen to notify the city, that would definitely place a target on the property which could open up a can of worms. I don't mind paying higher property taxes but I want to make sure I do this the correct way. Is it even worth the potential headache? I still have my contingencies in place to back out. [link] [comments] |
| Posted: 08 Jul 2020 08:22 AM PDT Anyone else dealing with a shortage of lumber near them? Everyone including lumber yards don't know when the next shipment will be (western Maryland). Trying to replace a deck but can't get 5/4 board! [link] [comments] |
| Why are wall mounted toilets not more popular? Posted: 08 Jul 2020 07:57 AM PDT My 61 year old house had two American Standard wall mounted toilets from 1959 when I moved in. I had to replace one of those with a modern equivalent when I moved in due to both the tank and the bowl being cracked. It was a bit more tricky than your standard floor mount toilet but really not that bad. The other one is still going strong though I replaced literally every piece inside the tank. Thing is - these toilets are just way nicer than floor mount toilets. So much easier to clean, and a cleaner look to the room, too. Now - I understand why wall mount, tank in wall toilets are not super popular - those things sketch me the fuck out. I feel like you're just signing up to have to rip out the drywall once every 5 years to service them. But with the style I have everything is outside the wall. So - any theories on why this style of toilet never took off? [link] [comments] |
| laminate vs vinyl flooring in the basement Posted: 08 Jul 2020 03:23 PM PDT Hey guys! We hired a contractor to renovate our basement. The quote we initially agreed upon was for laminate flooring in the basement. However, after doing some research, it would see that having laminate floors in the basement is not such a good idea. So, I asked how much it would cost extra if we were to go with vinyl floors. The contractor replied saying that vinyl will cost more as the installation process is more complicated. Material cost aside, is he just pulling my leg or does LVP floors require more prep work vs laminate? [link] [comments] |
| Getting quotes for driveway repaving. Airport mix vs. 9.5mm Posted: 08 Jul 2020 06:23 PM PDT Our driveway is crumbling away and needs to be fully torn out and repaved. We have gotten 4 quotes and it seem like prices vary wildly. Some companies want to do rock then 9.5mm asphalt. Other companies have told us not to do that becuase it will settle over time and try recommend a binder under the 9.5mm which doubles the price. The most cost effective quote was for 'airport mix' which we were assured could be sealed after a year and look the same as asphalt. Any suggestions or insight? Does airport mix look bad/cheap? [link] [comments] |
| Tiled wall meeting drywall. Ledge that needs to be addressed. Could use some advice. Posted: 08 Jul 2020 07:18 AM PDT Hey. So I've got this far (tiled myself and a few other thigns) in our little laundry room and I do not know what to do at this point. How do I address the gaps where the tile/drywall meet so it will look as nice as possible? As for the ledge, I figure I'm going to just slap tile on the top of it unless anyone has any suggestions (wood?)? I have a larger format tile that I could probably lay on top and then would need some kind of profile to fit between? It's approximately 73" or so wall to wall, approximately 4" depth or whatever. Not sure I thought this all through properly. Pretty new to this house/DIY stuff. Stoked about the tile job and other work I've done, but they are far from perfect. They make glass mosaic tile look so easy to apply on television, but it's hard to get perfect when never having worked with it before. If anyone has any suggestions I'd be very grateful. Time for some Googlefu. [link] [comments] |
| Posted: 08 Jul 2020 07:34 PM PDT First off, I'm not even sure what this is called. I am wanting to modernize this and do away with the ugly old style. I plan on ripping up the carpet and laying luxury vinyl plank. Whats the easiest way to install something newer and more modern while keeping it stable? [link] [comments] |
| How to install something like a 'whole home fan' to create airflow Posted: 08 Jul 2020 01:00 PM PDT I currently live in an older home that has central air, but the basement stays too cold while the upstairs in like a sauna. There is no airflow through the house and the air seems stale, I would like to make it possible to create some better ventilation to eliminate stale air and add a cooling effect similar to what I was suggested (a while home fan). I saw the options for a while home fan, but it doesn't seem feasible as I'm unsure of the attic situation (very difficult to get up there and I don't want to fall through the ceiling lol). Are there any other options to achieve something like this? Maybe something less invasive, without needing access to the attic? [link] [comments] |
| Does anyone have a remodel spreadsheet they would be willing to share? Posted: 08 Jul 2020 07:28 PM PDT Hi, I'm a first time homeowner (closing Friday!) and I plan to DIY a lot of the work so I want to keep a spreadsheet of my costs based on frequency of use. For example, I will be painting the bathroom first and will have to purchase all of the painting supplies (ladder, roller, tray, etc) but some of these items I'll keep and reuse for future projects and others (like paint & sandpaper) are more of a one-time use expense. Does anyone have a spreadsheet like this they'd be willing to share? I'm sure I can just make one up but I figured I'd ask! I also want to track how much time I'll spend doing everything but this component is not as important. [link] [comments] |
| Adding a recessed socket to a side table Posted: 08 Jul 2020 06:59 PM PDT Hey everyone! I am planning on adding a recessed socket power strips like the one linked below to a couple of side tables I have in my living room. They are made out of MDF, pretty cheap, but I am wondering what is the best way to cut the rectangular wholes needed for them. Top of the table is 1 inch thick, back is half an inch, I can place it in either location. I might be a able to procure a jigsaw, but I'm not completely sure so whatever is cheapest would be better. https://www.amazon.com/dp/B08B36TLB1/ref=cm_sw_r_cp_apa_i_uINbFbNF4ZBJD Thanks in advance! [link] [comments] |
| Posted: 08 Jul 2020 09:00 PM PDT Just bought a house and looking for ways to remove a pony wall. Hoping that it's simple since I have no background in this sort of thing. If anyone has tips or has done this before let me know if there's a trick to this or if there's something you would've done differently. wall [link] [comments] |
| DIY deer repellent? They are eating all my hydrangeas! Posted: 08 Jul 2020 11:36 AM PDT We just planted a bunch of hydrangeas along the side of my yard and the baby deer seem to just love the blossoms. We planted them and two days later all the blossoms are gone. Hopefully some more will grow before the end of the season! Do DIY deer repellants work? I have Home Depot just down the street but I'm always interested in something where ingredients I have around the house might work as well as a commercial solution. So far I've found https://www.deerbusters.com/blog5-diy-deer-repellent-recipes/ and https://www.bobvila.com/articles/homemade-deer-repellent/ both of which have a recipe that use a combination of garlic, raw eggs and cayenne pepper. I'll need to go buy garlic and cayenne pepper, so maybe the commercial stuff is just going to be cheaper anyway to keep the rats with hooves away! [link] [comments] |
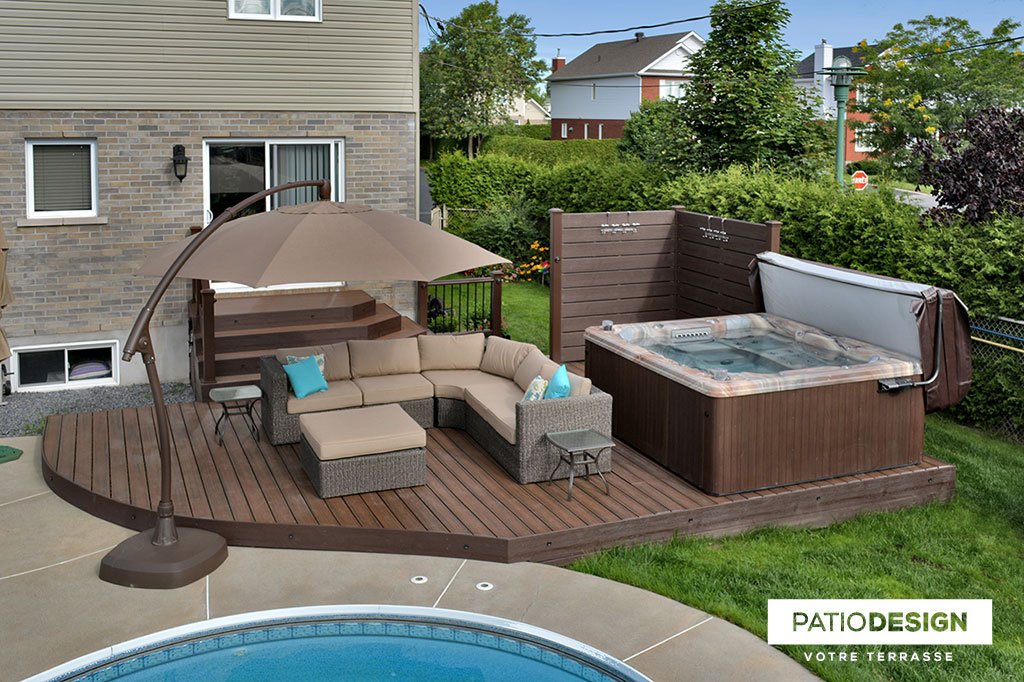
| Composite vs. Wood Deck for a Jacuzzi/Spa Tub Posted: 08 Jul 2020 12:07 PM PDT I'm considering a ground level deck (sitting on the ground) similar to the one in this link. However, since I'm putting a tub on it, is there a wood option that wouldn't require me to refinish every few years? I believe composite would be the best option for low maintanence and exposure to water. But what about the weight of the tub itself. Anyone with experience on this? [link] [comments] |
| Help with ideas for DIY backyard oasis...in a rental Posted: 08 Jul 2020 02:51 PM PDT My husband and I just moved into a house that we are renting in the PNW. The backyard is 100% grass with no patio of any kind. We have outdoor furniture we obviously want to use to enjoy the backyard, but without a clear and level surface, it's not working out great. I've obviously done some research, but everything I've found online is geared toward people that own their backyards and are willing to spend thousands of dollars on materials. Does anyone have ideas for how to make our backyard more interesting while keeping in mind that it's a rental? Some examples - any DIY patio ideas that don't involve concrete? Any products that you know of that can make a temporary patio/flat surface? How to hang lights without any structures other than the house itself? Or any other things that you have done in the backyard of your own rental property? Any suggestions welcome (and if you think this belongs in another subreddit, let me know that as well)! [link] [comments] |
| Could use help using a drain snake Posted: 08 Jul 2020 10:35 AM PDT I dont think Im inept but I feel inept using my drain snake. First off, the sumabitch is heavy and awkward so maybe that's a part, also feels like the handle is pointed the wrong way but regardless... I am trying to snake the drain for my washer since its burping up water at the drain. I can go about a foot down and I feel the snake stop. So I tighten the knob, start cranking, snake is spinning and I think its doing its thing, so I pull it up and... nothing. Do it again, nothing. Do it a third time and my forearm is starting to get tired here... and I get a fluff of a cottonball worth of fabric. SOMETHING is there, but the snake wont grab it. Am I doing something wrong? [link] [comments] |
| Best Attic Ladder--Wood or Aluminum? And Which One (Brand/Model)? Posted: 08 Jul 2020 12:22 PM PDT It is that time in my life--time to replace our attic ladder. We have been happy with the one we have and would keep it if we could find a replacement pivot arm (which is what broke). We have been looking at Louisville Ladders Champion (wood) and Elite (aluminum) series attic ladders. I don't want to have to replace it again and want the best I can get without breaking the bank. What is the best make/model out there? Thanks! Edit: The Fakro seems like the best ladder for me quality-wise, with the most options, and in my price range. The Fakro ladders run about $75 above the Werver and Louisville Ladders but the quality, according to reviews and research, seems to be much higher. And they make a steel (powder coated) ladder which the others do not. The Louisville Ladder and Werner attic ladders seem to be in the same class--builder class (although there is a better word for them that also starts with a 'c'). They are both made in Mexico and not very well quality controlled according to the reviews. The Rainbow is brilliant but out of my price range. [link] [comments] |
| courtesy to borrow neighbor's driveway? Posted: 08 Jul 2020 08:30 PM PDT I'm sure this might sound like something unnecessary to seek for advice. sorry. I newly moved to a house and have not known my neighbors yet. I need to do a few things to my house and my contractor told me that they needed to use my neighbor's driveway. I do not know my neighbor, and since this is a in-city neighborhood, using her driveway means that she had to move her car away. This is definitely some inconvenience but she can just park in front of the house. (we have really light traffic.) My question is what I should do. I'm thinking about offering her a gift card at a local grocery store, but I feel a bit odd to knock on the door, explain everything, and offer her a gift card... Should I send a mail instead? Or should I change the idea of gift card? If gift card is a fine idea, how much should I offer? I am sorry if this sounds a bit stupid but I really do not have any experience dealing with this kind of thing... [link] [comments] |
| [HELP] Need tips & strategies for my ditch project Posted: 08 Jul 2020 03:13 PM PDT I have a nice ditch going with rich soil & a variety of rock to fill with. It's roughly 30" wide, 6" deep and 40' long. I want the rocks to help run water & look ascetically pleasing...I hate to be so particular but I want to try and do a good job, right. What is the best way to go about tackling this? Work inside the middle with biggest rocks or flat rocks, then fill in the outsides? Thanks Redditors! [link] [comments] |
| Posted: 08 Jul 2020 09:54 AM PDT I'm looking to put 3 egress windows in my basement so that my kids can have their own rooms. I've seen posts here about people doing their own work on things like flooring and windows and saving a ton of money. What stories to folks have of doing egress windows themselves or pros/cons of using a company that specializes in this kind of work? For some perspective, I've installed windows before and I have access to a backhoe to dig out the area around the window. My main concerns are: cutting the concrete foundation and related structural issues. Cost wise I'm getting quotes that range from $3500 up to $7000, per window. Those prices are all the work and materials. (I'm in Colorado, so I expect them to be higher than average) The major advantages I see are, time, they'd be done in about a week and Insurance/warrantee, by using a single company if any thing goes wrong during install or down the road, I know exactly who to go to. On the other hand, the estimates call for about $1000 in materials per window, which based on just looking at Lowes website, I could easily match or beat without much trouble. I'd need to rent a demo saw, but I can't imagine that is more than a few hundred, hell I could buy one for just over $1000. I figure I'd spend the better part of a weekend digging out all 3. Then spend a weekend per window doing the cutting and install. Thus, even bloating my cost to $5000 for 3 windows installed, I'm looking at about a third the cost. Any insights are appreciated! [link] [comments] |
| Can I add a shower hose to this faucet? Posted: 08 Jul 2020 12:27 PM PDT Here is my faucet in my apartment: https://imgur.com/a/XtqcIWw It's supposed to just be used as a bathtub as no shower head is on the wall. Is there a product on the market that will for this faucet? I want to be able to shower here and figured there's gotta be a hose that fits. Thanks! [link] [comments] |
| Fluctuating water temperature from new tankless hot water heater Posted: 08 Jul 2020 04:11 PM PDT Brand new Navien 240A installed a week ago. First shower I took I noticed repeated, periodic temperature fluctuations, but wrote it off as due to dishwasher running at the same time. Next day, same problem, water temperature drops noticeably for a few seconds, then gets hot again. This happens periodically, like every couple of minutes. Over the next few days I experimented with different temp settings on the heater, trying 110F, 115, 120, 125. Same behavior with all. Then tried running the hot water full open at one sink while taking a shower, and this significantly reduced the problem. Just to have some data to show the plumbing company that installed the unit, I recorded the water temp over 12 minutes or so using a digital thermometer hooked up to my computer, taking readings twice a second. Here's a screen shot of the result, which I think proves I'm not crazy: graph of temperature over time Any ideas what could be causing this behavior and what to do about it? ps. I never had any problem like this before last week. The old heater was a 50 gallon tank. [link] [comments] |
| Help with outlet location for new wainscotting Posted: 08 Jul 2020 07:52 PM PDT Hello all! I am doing some work to my basement and I've come up with the idea of doing a raised pattern wainscotting. I've seen a lot of those accent walls with strips running in all directions. I want to try that but as a wainscotting. I just ripped out some pine boards the previous owner had nailed to the wall. I've started drawing out some pattern ideas with pieces running at a 45° angle and I am pretty happy with the initial idea. I then realized I'm going to have to deal with the outlets. The spacing doesn't really allow for an outlet to sit vertically so I might have to flip them on a 45° angle to match the trim. Will this look ridiculous? Does anyone else have any other suggestions? Here's a link with photos to better explain what I'm dealing with. Thanks in advance! [link] [comments] |
| You are subscribed to email updates from The Hivemind Improving Homes. To stop receiving these emails, you may unsubscribe now. | Email delivery powered by Google |
| Google, 1600 Amphitheatre Parkway, Mountain View, CA 94043, United States | |
No comments:
Post a Comment